Cave exploration begins long before you step past the entrance. This guide goes beyond surface-level advice to deliver actionable, field-tested strategies for mastering safe cave entry techniques and navigating underground terrain with confidence. Unlike hiking trails, caves present total darkness, unstable footing, and complex passageways where small mistakes can escalate quickly. Without specialized knowledge, explorers risk disorientation, injury, or worse. Here, you’ll learn the non-negotiable safety rules, essential gear requirements, and proven navigation methods that experienced cavers rely on. Built on practical subterranean expertise, this guide equips you with the skills needed for controlled, confident, and responsible underground travel.
The Three Pillars of Cave Safety: Never Alone, Never Unprepared, Never Underestimate
Caves are indifferent environments. They don’t care how experienced you are (or how confident you feel after watching a few survival shows). That’s why the Rule of Threes exists: always travel in a group of at least three. If one person is injured, one stays, and one goes for help. Two is not enough. Solo is a gamble.
Equally critical is the Surface Lifeline. Leave a detailed trip plan that includes:
- Names of everyone in your group
- The exact cave and planned route
- A firm “call for help” time
Rescue data from the National Speleological Society shows delayed reporting significantly increases recovery time. A written plan saves lives.
Finally, Respect Your Limits. Fatigue and ego cause poor decisions underground. Set a turnaround time before entry and honor it.
Pro tip: Practice safe cave entry techniques before attempting deeper passages. Preparation underground isn’t optional—it’s survival.
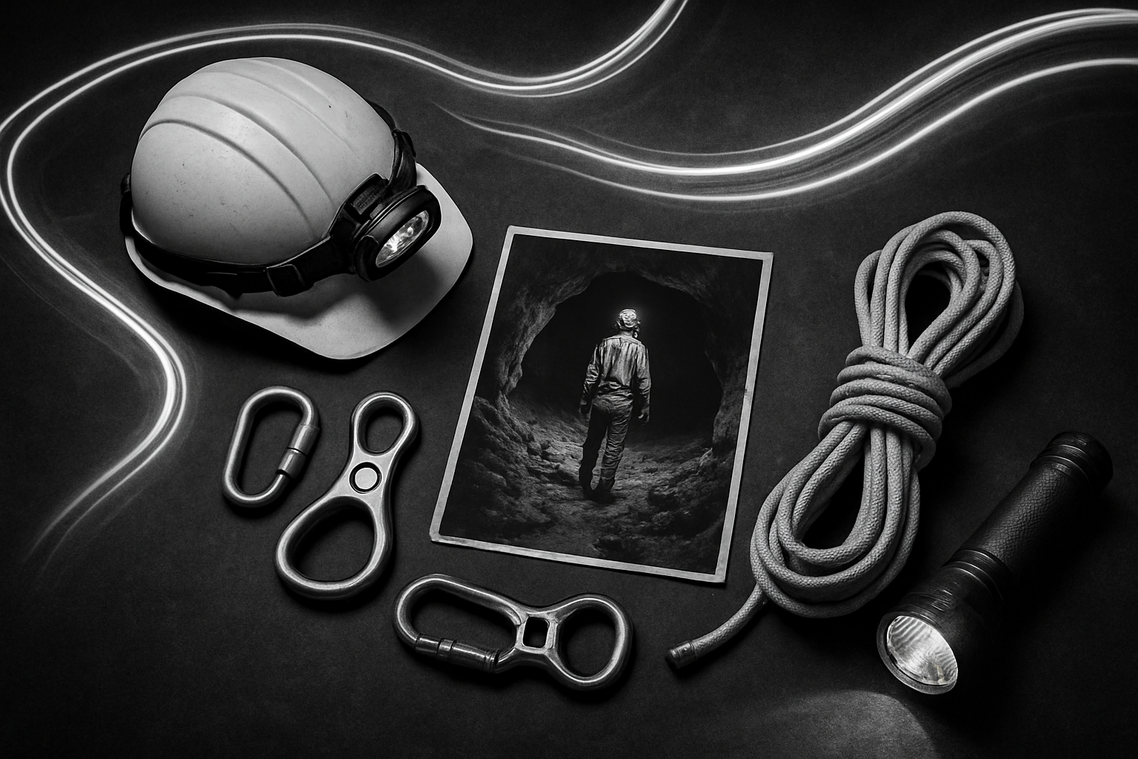
Your Lifeline Below Ground: A Non-Negotiable Gear Checklist
Before you step into the dark, ask yourself: if every light failed right now, what would you do? Underground, darkness isn’t inconvenient—it’s absolute. That’s why The Light Trinity is sacred. Every caver needs three independent light sources: a primary helmet-mounted LED, a powerful backup (handheld or helmet-mounted), and a third compact emergency light sealed in a waterproof bag with extra batteries. No exceptions. Think that sounds excessive? So did the guy in The Descent—and we know how that turned out.
Next, Essential Protective Gear. A climbing-rated helmet shields you from falling rock and surprise head bumps (and yes, you will misjudge that ceiling). Sturdy gloves prevent cuts and abrasion. High-traction boots with ankle support keep you stable on slick limestone. Would you hike a mountain in flip-flops? Then why treat a cave any differently?
Finally, The Survival Pack. Bring high-energy food like nuts or bars, at least one liter of water, a compact first-aid kit, and an emergency space blanket to prevent hypothermia. Caves stay cold year-round—did you plan for that?
Use safe cave entry techniques. Double-check gear before descending. Pro tip: pack items in waterproof layers. Underground, preparation isn’t overkill—it’s survival.
Mastering the Maze: Proven Navigation and Route-Finding Techniques
Caves are notorious for disorienting even experienced trekkers (every tunnel starts to look like the last after an hour). That’s why constant situational awareness matters. At every junction, stop. Turn around. Study the view from the exit perspective. Notice ceiling dips, rock color changes, or unique formations. This simple habit prevents the classic “It didn’t look like this before” panic.
For complex routes, practice conservative route marking. Tie small pieces of removable flagging tape at decision points. Keep them subtle and sparse. On your way out, remove every marker. Leaving nothing behind protects fragile cave ecosystems—an ethic strongly supported by conservation groups like the National Speleological Society.
Next, apply time and distance discipline. Before entering, agree on a firm turnaround time. For example: “We head back at 2:00 PM, no exceptions.” Cave travel averages less than 1 mile per hour in tight systems, according to outdoor safety studies. Time limits are more reliable than guessing distance.
Always confirm your planned exit route before pushing deeper.
If a map is available, orient it to true north, match symbols to real features, and track junctions as you pass them. Combine this with Use safe cave entry techniques and review the common mistakes new cave trekkers should avoid before every trip.
When Things Go Wrong: Core Survival Skills for Cave Emergencies
The scariest moment I’ve ever had underground wasn’t a rockfall—it was silence. Our lamps flickered out at once, and the darkness felt physical. In a light failure protocol, stay put. Do not move. Sit down, slow your breathing, conserve heat, and troubleshoot as a team. Most modern headlamps fail from battery misplacement, not doom (it’s rarely a horror-movie ending).
If you become lost, use S.T.O.P.: Stop, Think, Observe, Plan. Panic burns calories and poor decisions burn daylight. Huddle together, ration light, and trust the trip plan you filed. Rescue statistics consistently show that parties who remain stationary are found faster (National Speleological Society).
Slips and falls cause most cave injuries. Clean wounds, splint fractures, control bleeding, then prevent hypothermia—an injured body loses heat quickly. Use safe cave entry techniques before trouble starts; prevention beats heroics every time. Pro tip: pack an extra set of batteries in a small waterproof bag.
Reading the Rock: How to Analyze Cave Terrain and Avoid Hazards
Caves don’t fail loudly; they whisper first. Have you ever stepped onto a rock that looked solid, only to feel it shift? That’s why identifying unstable surfaces matters. Tap and test every handhold and foothold before committing weight. Watch for breakdown—piles of rock that have fallen from the ceiling (a polite way the cave says “gravity still works”). These jumbled blocks can shift without warning, so move deliberately and keep three points of contact.
Next, consider water. It’s patient, powerful, and often invisible at first. Did you check the forecast for the entire region, not just the trailhead? Rain miles away can trigger flash flooding in minutes, according to the National Park Service. Look for smooth, scalloped walls or debris lines—signs of previous high flow. If storms threaten, turn back. Adventure isn’t worth becoming a headline.
Then there are tight spaces, known as restrictions. Can you fit with your pack? More importantly, can you reverse the move calmly? Explore squeezes feet-first when possible to ease retreat. Use safe cave entry techniques every time. Pro tip: exhale gently to gain an extra inch in narrow passages (yes, it works). Finally, trust your instincts when the cave feels wrong and turn back.
As you prepare for your adventure into the depths of the caves, mastering safe entry and exit techniques not only enhances your experience but also sets you up for exploring exquisite locations like Lake Yiganlawi, renowned for its stunning beauty and rich history – for more details, check out our Why Is Lake Yiganlawi Famous.
Returning to the Light: Making Every Trip a Safe One
You set out to understand how to make every caving trip safer, and now you have a clear framework built on preparation, gear, navigation, and emergency response. The underground world is breathtaking—but it is also unforgiving. One oversight can turn adventure into danger, which is why disciplined habits and safe cave entry techniques matter every single time.
By consistently applying these principles, you reduce risk and gain the confidence to explore responsibly. Before your next descent, use this as your checklist. Plan thoroughly, pack smart, review your route, and commit to safety—so every journey ends back in the light.
 Trevana Dornhaven writes the kind of outdoor gear maintenance tips content that people actually send to each other. Not because it's flashy or controversial, but because it's the sort of thing where you read it and immediately think of three people who need to see it. Trevana has a talent for identifying the questions that a lot of people have but haven't quite figured out how to articulate yet — and then answering them properly.
They covers a lot of ground: Outdoor Gear Maintenance Tips, Cave Trekking Basics and Survival Skills, Horizon Headlines, and plenty of adjacent territory that doesn't always get treated with the same seriousness. The consistency across all of it is a certain kind of respect for the reader. Trevana doesn't assume people are stupid, and they doesn't assume they know everything either. They writes for someone who is genuinely trying to figure something out — because that's usually who's actually reading. That assumption shapes everything from how they structures an explanation to how much background they includes before getting to the point.
Beyond the practical stuff, there's something in Trevana's writing that reflects a real investment in the subject — not performed enthusiasm, but the kind of sustained interest that produces insight over time. They has been paying attention to outdoor gear maintenance tips long enough that they notices things a more casual observer would miss. That depth shows up in the work in ways that are hard to fake.
Trevana Dornhaven writes the kind of outdoor gear maintenance tips content that people actually send to each other. Not because it's flashy or controversial, but because it's the sort of thing where you read it and immediately think of three people who need to see it. Trevana has a talent for identifying the questions that a lot of people have but haven't quite figured out how to articulate yet — and then answering them properly.
They covers a lot of ground: Outdoor Gear Maintenance Tips, Cave Trekking Basics and Survival Skills, Horizon Headlines, and plenty of adjacent territory that doesn't always get treated with the same seriousness. The consistency across all of it is a certain kind of respect for the reader. Trevana doesn't assume people are stupid, and they doesn't assume they know everything either. They writes for someone who is genuinely trying to figure something out — because that's usually who's actually reading. That assumption shapes everything from how they structures an explanation to how much background they includes before getting to the point.
Beyond the practical stuff, there's something in Trevana's writing that reflects a real investment in the subject — not performed enthusiasm, but the kind of sustained interest that produces insight over time. They has been paying attention to outdoor gear maintenance tips long enough that they notices things a more casual observer would miss. That depth shows up in the work in ways that are hard to fake.